Avis Licht

I received my B.S. in Conservation of Natural Resources, from the University of California, Berkeley. After that I studied with the great horticulturist, Alan Chadwick for 2 years. He brought French Intensive organic gardening to its height in Santa Cruz, California and many of his students have gone on to start farms, seed companies, and teach organic gardening. In 1978 I co founded the Commonweal Garden in Bolinas It was an organic farm and teaching center. Since 1983 I've been designing and installing landscapes in California. Edible landscaping is my specialty, but sustainable, native plant, and ALWAYS BEAUTIFUL gardens are what I love to do. After 35 years of gardening and designing gardens, I've decided to share my experience using the internet to reach more people. I hope you find what I have to say, useful, interesting and inspiring. Please let me know what areas you're interested in. Thanks for stopping by.

Jan 262012
 
Strawberry

by Avis Licht

Strawberry

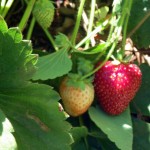
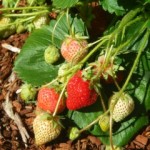
Who can resist a ripe strawberry?

I recently wrote about fruits that you can grow in small yards. At the top of the list was strawberries. Here are some easy tips to get the best fruit from your plants.

There are many varieties of strawberries. June bearing produce one large crop a year in late spring or early summer. Pick the varieties best suited to your climate. Everbearing strawberries have smaller crops in early summer and fall. Day neutral bear intermittently through the summer.  Since you’re planting for your own use I think it’s best to have several varieties that bear throughout the whole growing season.

CLIMATE

You can find a strawberry for almost any climate. In very hot areas they should have mid day shade. Plants won’t flower over 85 deg F/29 deg C. If you live in extremely cold climates there is even a strawberry that can grow in -30 deg F/-24 deg C without mulch. During blossoming the weather shouldn’t go below 30 deg. F.

Everbearing strawberry

White flowering, red fruiting, beautiful in the edible landscape

SOIL

Topsoil of turf/loam amended with compost and well rotted manure is best.  Be sure not to get the manure near the crown of the plant.  Dress the bed with bone meal and wood ash. It should be well drained and slightly acidic.

WATER

Water the bed when the soil starts to dry out.  Keep the soil moist, but not over wet. When the berries start to ripen cut the watering in half.  Stop watering when they are ripe. If you give strawberries too much water they will get big, but not taste as sweet. Drip irrigation is best to avoid disease problems and fruit rot.

SITE

Full sun for standard strawberries and partial shade for alpine strawberries.

PLANTING

Dig a bed that is loose and friable with good drainage.  Make a hole for your plant and mound the center. Lay the roots around the pyramid of dirt in the hole.  Be sure to keep the crown above soil level or the plant will rot. Water your plant in well. Mulch to keep moisture in. I don’t recommend straw as a mulch because it will promote mildew and be a home for insects.

Description on strawberry planting

Spread their roots and keep the crown above soil level

HARVEST

Wait until the fruit is very red and harvest with the stem. Don’t wash the fruit until you’re ready to eat it.  Homegrown strawberries are like a completely different species than what you will find in the store.  Because you can harvest them ripe and eat them right away.  They will not last long off the plant.

Strawberry fields forever

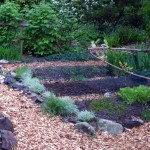
Strawberries planted in the edible landscape


Jan 252012


by Avis Licht

Size matters in sowing seeds

Very large and very small seeds often should be sown directly into the soil

There are times when sowing seed is the best way to start your plants, and times when you would do better to buy seedlings. Here are a few of the most commonly made mistakes and how to avoid them.

Mistake: Sowing seed into pots that should go directly into the ground.

Correct : Sow directly into the ground

Direct sow into the ground for best results

Plants with taproots like beet and carrot need to be sown directly into the ground

Some seeds are best sown directly into the soil where they will grow. Root crops like carrots, beets, radish and turnips have taproots that don’t like to be transplanted.

Very small seeds, like poppies and carrots can be mixed with sand in order to spread them more evenly.

Large seeded plants like beans and peas do better when sown directly into the ground.  You should plant them 2 to 3 inches deep. They send a large root deep into the soil and don’t like to have their roots disturbed.

direct sow your fava beans

Large seeded plants like beans and peas can go directly into the soil.

Mistake: Sowing indoors without sufficient light

Correct: Use additional lights

In  the hopes to get a jump on the growing season, people like to start their seeds indoors.  It is almost impossible for plants to get enough light from a window to grow strong and healthy.  Leggy seedlings rarely recover and won’t make for strong plants when transplanted.

Leggy seedlings need more light

These broccoli seedlings are leaning toward the window for more light. They are leggy and not what we’re looking for

If you do want to start indoors, get fluorescent lights and put them over your containers.  You can find these through catalogs or make a simple set up yourself. Full spectrum lights are best, but regular lights will also work.

Mistake: Sowing too soon in the season

Correct: Be patient and wait. Learn the last frost dates for your garden and what your particular plant needs.

In the excitement to get plants ready for planting outdoors, we often start plants too soon.  This is especially true for warm weather crops like tomatoes, cucumbers and peppers. Even if you have a warm spell early in the spring, it doesn’t mean that you’re plants will be happy outside.  Both the night temperatures need to warm up and the soil needs to warm up.

You can plant early if you use special precautions like cold frames, “Wall o Water”, cloches and row covers. These will protect your plants from those extra cold nights.  But don’t sow your seed early  if you’re not prepared to go the extra step for plant protection.

Mistake: Sowing too many seeds and too many difficult to grow and germinate seeds

Correct: If you’re new at sowing, pick a few of your favorite plants that are easy to germinate. Don’t be fooled by those beautiful pictures in the catalogs. Beware impulse buying!

If you have a small garden and would like a variety of vegetables, it’s often better to buy your seedlings from the local nursery or farmer’s market.  You can get just amount that you need and more varieties.  Instead of 20 plants of one variety, why not get several heirloom varieties and see what does best in your garden.


Jan 232012
 
Strawberries


by Avis Licht

Strawberries

You can have great fruit growing in a small garden.  Here are some of my favorite and easy to grow fruits. Each of them has their own particular needs, so be sure to look up which varieties are best for your climate.

Strawberries are at the top of my list. They can be grown in small areas, they can be planted in pots and they can be spread around the garden.  Commercially strawberries are one of the most heavily sprayed plants both with herbicides and pesticides.  It’s much better to grow your own.

How can a bamboo stick keep a large dog out of the strawberries

Can you have too many strawberry plants?

If you want a fruit tree for a small space, consider a genetic dwarf fruit tree.  They are bred to be smaller without pruning. You can have a full sized apple, cherry, nectarine and more that is only 6 ft tall.A small space is fine for an espalier fruit tree

An espaliered tree can be trained to grow against a wall or fence and take up very little room.  This requires some real attention and work to keep the tree properly pruned and still produce fruit. But once you learn how, it can be incredibly productive in a small space.

Citrus trees can be grown in large pots in a sunny spot near the house or on a deck. Choose naturally dwarf varieties so that they won’t outgrow their containers.

Mandarin orange in a container

It's easy to grow citrus in a pot


Citrus are wonderful for the edible landscape because they are evergreen, fragrant, produce fruit and look beautiful.  Another winner.

Whenever plants are put in pots, be sure they get enough fertilizer to keep them healthy, and regular water.  Pots can dry out quickly because  they are exposed to the sun and wind.


Surprisingly, fig trees can be happily grown in pots.  Normally a fig will grow quite big, but it can be tamed to fit your small garden in a pot and still be healthy and produce plenty of fruit.

Fig in a container

Figs thrive in planting containers

Dwarf blueberries  stay small in the ground and are good for container plantings.

These are a few of my favorite fruits for the small edible landscape.  Enjoy!


Jan 202012
 
Raised beds


By Avis Licht

Raised beds have many advantages.  They  provide better drainage,  better access, better plant growth and reduced soil compaction.  There are many ways to build a raised bed.  Let’s  see what would be best for your garden.

Raised beds

Double dug beds are raised and need no edging

The Simplest Raised Beds

These don’t need any built up edge, they only need to be double dug.

This act of digging and moving the soil aerates it and raises it up. Here’s a more detailed explanation.  This is especially effective when opening up the soil for the first time.    By creating “beds” instead of rows, you leave paths for walking and you never step on the bed.  This prevents compaction and allows water and air to penetrate the soil, making for healthier roots. It also lets you plant in a more intensive manner.

Double digging is hard work, but doesn’t need to be done every season. In another post I’ll show you the many reasons for using this method, and different ways you can incorporate  fertility.

Stone for raised beds

Raised beds using stone for both low and tall walls

Stone Raised Beds

Stone lasts forever, and looks beautiful.  It is also easy to create  curving lines in the garden.

As you can see in the photo above, you can use stone to edge your beds, it defines the line and creates a clear path.You can use it to build a wall, which is especially effective on a slope. In this garden, the curved bed was built to 2 ft high, which helps the owner who has back issues.  We  used the opportunity of the height of the bed to bring in some good organic topsoil.

If you bring in soil, be sure to loosen up the bottom of the bed.  It doesn’t help to bring in good topsoil if you don’t have good drainage.

Cost is a factor in deciding whether or not to use stone.  It can be expensive if you have to buy it, and  it takes time to install it.

buildiing curves with stone is easy

This curved bed looks good even when the garden is dormant

Wood Raised Beds

Wood is commonly used for building raised beds in the vegetable garden. Use recycled wood if possible.  Buying redwood or cedar has many implications to the environment.  If you are only raising the beds a few inches, I don’t think wood is worth the effort or the cost.

If you do use wood, be sure not to use pressure treated wood. This includes old railroad ties. The chemicals in this wood are hazardous to your health and the environment.  This article covers the pros and cons of using wood.

Bamboo raised bed

Bamboo or willow can make a great raised bed, especially if you are growing it yourself

You can even find recycled plastic for raised beds. Kits with all the materials you need can make the project simple.  Gardener’s Supply carries all kinds of raised bed kits.


Raised beds with stone from the site

The raised bed just planted


When deciding whether to use raised beds in your edible landscape consider your site, soil, resources and aesthetics.


Vegetable garden

The raised bed a year later-- vegetables and flowers

Jan 182012


by Avis Licht –

 Water and the World

The earth through a drop of water – Thank you Markus Reugals, photographer

 Here’s an amazing fact:

All the water that is on the earth now has always been here!  No water has ever been gained or lost in the water cycle. Global warming is radically changing the availability of water on earth and it’s distribution: either through storms, hurricanes or droughts.

Glaciers hold water in the form of ice.  On mountains, these glaciers slowly release water in the summer for farmers to use on their crops. As the Earth’s temperature warms up glaciers are not only receding, but disappearing.  This is a huge problem for farmers who will not have water available to them in the summer when they need it.

The driest year in many decades

December 2011

These two photos were taken in the same place exactly one year apart. One year had the most snow in modern history, the following year, had the least snow recorded.


One year the snow is heavier than ever

December 2010


Being conscious of changes in our climate will encourage us to make good choices in our use of  precious water resources.  Those of us who grow food will have an opportunity to make many  choices in the garden – let us choose wisely.

In the next period of time, I’ll be talking about how to create healthy soil, rain water harvesting, slowing the movement of water and returning it into the water table, best irrigation practices and much more.

There’s so much we can do to take positive action in the garden.

After two months of winter drought - Rain!

After months of drought we look forward to rain - Let it begin!


Jan 172012
 
Pruning a deciduous fruit tree


by Avis Licht

Pruning a deciduous fruit tree

This cut allowed an outside bud to become a branch

Fruit trees give better harvests with good pruning techniques.  That said, most people are worried about pruning their fruit trees. If you are one of those folks that hesitate to make that first cut for fear of damaging your trees, FEAR NOT! With these few easy steps you can help your trees and begin the process of learning how to be a great pruner.

Most trees are very forgiving.  Of course, there’s lots to learn about what different species need, but there are some techniques that work for all trees.

Be sure to use sharp and sturdy clippers.  This will make it easier on you and give better cuts.

Remove dead and diseased wood.

This is only tricky because when the leaves are off the tree sometimes it’s hard to tell what’s dead and what’s alive.  Dead branches are usually darker, wrinkled and brittle.  To check a branch, rub your finger nail along the branch and if it’s green underneath, it’s alive.

Pests and diseases enter a tree through dead or damaged wood.  So this is an easy and useful kind of pruning. Cut the branches back to a live trunk or branch. Remove all dead and diseased wood from the garden.  Don’t put it in the compost or shred it.  These go to the dump.

Remove crossing branches.

Crossing branches need to be pruned out

These are some serious crossing branches


One of the aims of pruning is to open up the tree to air and light. Cut back all crossing and overlapping branches. Remove one of the crossing branches and leave the other.

Prune out the crossing branches

Two branches cut back, one left to grow.

Remove weak branches.

Usually you want to remove thin and weak branches and leave only the most vigorous. But if your tree is young and doesn’t have many branches, leave some of the weaker branches that will produce leaves and feed the tree.  Come back next year and prune those branches.

Remove suckers.

Suckers are the fast growing branches at the base of the tree below the graft.  Keep these cut back throughout the year.  They are from the root stock and you do not want them.  There are also suckers higher up in the tree that grow fast and straight up.  These are water shoots and will not fruit.  They create shade to the tree.  Take these out in mid to late summer.

Keep your shears clean and sharp. Remove all dead leaves and branches from the tree.

If you follow these simple rules you’ll do great good and no harm to your trees. Soon I’ll give you tips on pruning your fruit trees in more detail. In the mean time you should have a look at this simple pruning video from Peaceful Valley Farm Supply.


Jan 132012
 
sowing seeds

by Avis Licht

sowing seeds

Sowing seeds and germinating in the kitchen window

Seeds, though small in size are a force of nature.  They carry the future in their tiny form. All the information to grow a might oak is in that tiny acorn.  In nature, every seed is slightly different and allows for the possibility of change:  sometimes better, sometimes worse than it’s parent.  Depending on the conditions after sprouting, a seed can grow strong and healthy or be weak. Like a person with a strong immune system, a healthy plant can withstand disease and attack by pests.

Seed packets

Get seed from organic, reputable seed companies


I’m not going to get into a discussion here about hybrid seeds or GMO, but allow me the premise that healthy plants produce healthy seed and it is to your benefit to choose seed from reputable companies that sell healthy, organic seeds.

It is then up to you to make sure you give those seeds the right growing conditions: from the soil you use to plant them, to the sun and warmth for sprouting. In this post you’ll learn how to mix your soil, sow seed, cover it and water it. It sounds simple, and is, but there are a few basic things you can do to assure success.

earthworm castings

Earthworm castings are a wonderful medium for starting seeds

Soilless seed starter medium

Clean, light medium for starting seed is a good idea


1. Choose your seeds: Pick the right plant for your climate it and sow it at the right time. Pick your favorite veggies and see if they are appropriate for your climate and the size of your garden. You can do this by googling your plant, reading seed packets, or talking to your gardening neighbors.  they often have the best information. In the U.S. you can get a lot of information at this site, SmartGardener.com by typing in your zip code.

2.Mix your seed starting medium: Seeds have enough energy in them to germinate and grow their first true leaves.  After that they need some, but not a lot of nutrition in their sprouting medium.  We can call this needing breakfast.  I mix my own compost or earthworm castings in with a medium like the Seed Starter from E.B. Organics. This starter is sphagnum moss, perlite, and gypsum.  It is clean, light and has no real nutrient.  Seeds will germinate and send roots quickly into the medium.  By mixing it with a little compost or earthworm castings you will add “breakfast”.

filled seed containers

Put the seed medium into container and tamp it down.

Seed starting medium - mix it up a little

Mix different materials in a container


3. Sow your seeds on the surface.  In the small six packs (recycled, of course from previous use), I put 2 seeds per section.  In the larger 2 inch pots I put 4 seeds per pot, and in the 4 inch container I put 6 – 8 seeds.  I use the larger pots for quick germinating larger plants, like chard and broccoli. I use the smaller pots for lettuce, spinach,bok choy and smaller plants. Lightly cover the seeds.  The smaller the seed, the less soil on top.  Your seed packet will tell you how deep to cover your seed.

Kitchen window provides sun

In my kitchen greenhouse window I can start seeds early in the season.

4. Lightly water your seeds.  A heavy  flow of water will displace your seeds. Use the lightest setting on your watering wand, a light sprinkling can or a spray bottle.  Be sure that your medium is moist before you put the seed in it.  You want it moist, but not soaking wet. Seeds need to be kept moist until germination.  If they are in the sun, be sure to water them a few times a day.

Broccoli seedlings

Seedlings this size are ready for planting outside

Next step will be how to prepare your garden beds.  We’ll talk about that tomorrow.

You’re ready to grow wonderful, delicious food in your edible landscape. Whether you have pots on the deck, a few square feet, or an entire yard for growing, only do as much as you can happily take care of. Remember, you’re trying to enjoy this project.

the ornamental vegetable garden

A vegetable garden doesn’t have to be square


Jan 112012
 
Ripe kiwifruit
Ripe kiwifruit

These fuzzy skinned kiwis are Actinidia deliciosa. They ripen in the late fall.

Kiwis seem exotic, but they grow in many climates. They are fast growing, luscious and need plenty of room to grow on a strong support.

SITE: Full sun, and protected from the wind.

CLIMATE ZONES: All kiwis come from  eastern Asia. Fuzzy skinned kiwis can take cold down to 24 deg F. There are varieties called Arctic Beauty kiwi, that are hardy to well below zero deg. F, and the fruit is much smaller. In very hot climates you may need to protect them from the summer sun. But kiwis grow in a wide range of climates and temperature.

SEX AND THE KIWI: The kiwi vine is strong and rampant and needs a sturdy structure to hold it up.  Place the vines at least 15 ft apart.

You also need a male and female plant for pollination. Sex in the plant world is as important as the human world. When you go to the nursery to get your plants, be sure to look at the label to make sure you get a male and female.  It can take up to 5 years from planting to get fruit.  But once you do, you can get up to 200 pounds per vine.

Kiwi Fruit on trellis

Kiwi vine on a strong trellis

SOIL:  The soil should be moderately rich, with good drainage. Give them plenty of compost.

WATER: They also like regular water through the season. Be sure to mulch your vines well, to keep the soil from compacting and to hold in moisture.

PLANTING: You can put in  bare root plants in winter when they are dormant  or you can put container plants in any time during mild weather.

If your garden is large enough, I recommend the kiwi for your edible landscape as a beautiful vine and a wonderfully producing fruit. It does require pruning and maintenance, but is relatively pest free.

HARVESTING: Kiwis in Northern California ripen in mid to late November.  I started harvesting my fruit mid November.  Kiwis DO NOT ripen on the vine.  They are firm to the touch when picked. Place them in a paper or plastic bag, with an apple or banana, to ripen for about a week.  Be sure to test them often. When they start to give a little, they are ripe.  Just peel it and try it.  If you have a lot of fruit, like I did this year, you can harvest them and place them in the refrigerator or other cool spot where they will stay for a few months without problem.

Bring them into the warm room in a bag to ripen as needed.


Jan 092012
 
Red Raspberries

by Avis Licht

Raspberries are growing in the wooden stake area

Raspberries have their place in a large garden, but beware - they will spread like wildfire!

Raspberries are delicious and easy to grow, BUT they have some very big drawbacks. So before you go buying and putting those puppies in the ground read this cautionary tale. Then I’ll tell you how to prune them. Remember, this is a pruning post, not a planting post.  How to plant and care for your raspberries, will be another day.

Red Raspberries

These are everbearing rapsberries, that produce in Spring and Fall

Raspberries grow from perennial roots that produce thorny canes.  They spread horizontally underground. If you live in a climate where it rains during the growing season, or if you irrigate  near the raspberries, you will find that they spread rapidly outside their growing bed.

You can do one of two things to control the spread of underground runners.  Next to your bed you can dig a trench 12 inches deep and put in a root barrier. This would be a material like aluminum, wood or plastic that will keep the runners from spreading horizontally.

Or, you can dig up the runners as you see them springing up in the garden. To my chagrin, I have found runners throughout the garden. Especially in late Spring, you can find me running around like a mad woman digging up unwanted canes. Sometimes it feels like they’re growing as fast as I can dig them up. Some people say it’s easy to dig them up, but my experience is that their roots get entangled with other plants. It’s a pain in the butt to dig them up, so Planter Beware!

If you have a small garden, with room for only a few plants, I don’t think it is worth planting raspberries.  It takes at least 10 original plants to produce enough fruit to make it worth the trouble. That would be a bed 3 ft wide by 20 ft long. Not to mention the maintenance.

On the other hand, once you’ve decided that you have enough room and can keep up with the maintenance, I say, you can’t have too many.  They cost a lot of money in the store, and when you grow them at home, you can eat as many as you want. Who can argue with that?

The most common plants are “ever -bearing” or “twice- bearing” raspberries.  You plant them in the Spring and they produce their first crop in the Fall. Prune these shoots back  in the Winter, and they produce new shoots in the spring that produce a second crop.  These canes will die back after their Fall harvest.  New shoots that come up in the Spring will produce your Fall crop.

In the winter you want to cut back all the dead canes to the ground, prune out any weak shoots that are smaller than a pencil in diameter, and cut the live canes back to 12 inches. Dead canes are brown and live canes are green.  If you have trouble telling the difference in your canes, make a quick cut towards the top of the cane. If it has green around the stem, it’s a live cane.  If the whole cross section of the cut is brown, yep, it’s dead – cut it all the way to the ground.

The pictures below show how mine look before and after pruning.

dormant raspberry canes

BEFORE: Canes of everbearing raspberries before pruning


Pruned raspberry canes

AFTER: Canes have been pruned to about 12 inches above ground.

Raspberry canes, pruned and thinned

Cut out all dead and weak canes. Cut back to 12 inches

In these photos you’ll notice that I have them growing inside a simple wooden structure.  I took some old Redwood pickets, and put them in the ground around the raspberries. The cross pieces are at 2 ft and 4 ft high.  This simple training structure keeps the canes inside, upright and easy to pick.  There’s no tying or drooping.  Anything that grows outside the structure gets dug up. It also looks nice in winter when the canes are dormant.

Despite my warning about raspberries, I think they are a great plant for the edible landscape as long as you know what you’re getting into.

To find out more about raspberries read this excellent article from Fine Gardening Magazine, How to Grow Raspberries.


Jan 042012
 
A garden full of herbs for birds, butterflies and humans

by Avis Licht

A garden full of herbs for birds, butterflies and humans

Herbs are wonderful plants for the edible landscape -beautiful and healthy

 Herbs have many uses in the landscape.  Many have a culinary use, many are used medicinally, they are generally easy to grow, their flowers are an excellent source of pollen and nectar for birds, bees and insects, often drought resistant and long lived.  Well, it doesn’t get much better than that for a multi use plant.

In the two previous posts, I talked about making garden design decisions based on your climate and place and on your desires. When choosing plants to fill in the landscape you not only want to use plants that are pretty and useful, but also “belong” there.  By belonging I mean that they fit in with the style of your garden, whether formal or informal, that they will thrive in the conditions and that they work in the scale of the garden.

A mixed herb and ornamental garden

Herbs are interplanted with ornamentals near the house for easy access

This is a newly planted garden.  The herbs are young and small. When mature they will fill in the area and create a feeling of beauty and lushness. When the herbs have been harvested at the end of the season, there will still be ornamental plants in the garden that keep it looking good over the winter. This is one of the best tricks in an ornamental edible landscape design.  Combine your annuals with shrubs and perennials so that you don’t have periods in the garden that look bare.

Purple and Green Basil

Mix your foliage colors for interest

Salvia, basil, parsley and thyme

Multiple herbs, both annual and perennials work together


This particular herb garden has thyme, sage, oregano, tarragon, dill, chives, parsley, cilantro and several varieties of  basil. We also used rosemary and thyme to cascade over the wall, with nasturtiums for added color.  Many of these plants have edible flowers. The herbs grow quickly and fill in the garden.

The ornamental plants in this bed include Azalea, Pieris, ferns, and Polygala. These are shade loving plants, which we put closer to the tree. We put the herbs in the sunniest part of the bed.  It was a little tricky, but you can see by the photos that the herbs grew well even in part shade.

Rosemary is larger and long lived

Give your Rosemary plenty of sun and room to grow

Nasturtiums cascading over wall

Mixed annual and perennial herbs cover the retaining wall


A few of the herbs that are planted more for beauty than culinary use include lavender, salvias, yarrow and ornamental oreganos.  By going to your local nurseries you will find appropriate herbs for your garden’s beauty and health. Peruse some of the catalogs in the Resource page of my website and you will find many herbs both common and unusual that will be just right for your garden.

Pink Yarrow - Achillea millefolium

Pink yarrow lives a long time and requires little care or water


Jan 032012
 
Deer fence with copper sculpture

by Avis Licht

Deer fence with copper sculpture

A front yard fence that is beautiful and functional

Yesterday I talked about the steps involved in making a landscape plan.  Today I want to share with you a small front yard garden that used those guidelines.

The first parameters you need to look at are your climate, sun/shade, slope, access, existing structures and plantings.  Don’t forget that the sun moves not only east and west, but north and south. The sun is high in the sky in summer and low on the horizon in winter.  Be sure to locate north and watch the sun/shade patterns in your garden over time.  You will be amazed how little sun you have in the winter compared to summer if you have any tall trees or structures.

Path divides garden into shade and sun microclimate

The path divides the garden into edibles and ornamentals based on the sun

In the photo above you can see a 2 story house that creates a lot of shade on the garden. The garden is on the north side of the house.  This means that in winter almost the entire garden is in shade.  In summer the garden has plenty of sun from the path to the fence. Using this information, I created vegetable beds in the sunny part of the garden for Spring to Fall crops.  The beds closest to the house are landscaped with shade loving ornamental shrubs and flowers.

Raised stone bed and bird bath

Using beds with stone to create form and structure keeps the garden looking good all year

The yard is curved to use as much of the available ground the gets sun in the early Spring.  The fence is 6 feet high and keeps the deer out.  The fence is also used to grow climbing vegetables such as peas, beans, cucumbers and tomatoes. Because it is on the north side of the garden it doesn’t shade the other beds.

Once you’ve determined your site functions, based on climate and position, it’s time to start looking at your desires and finances. In this case the owner was a single person with a limited income as a teacher, but who hopes to live here the rest of her life and wanted to make it a special place to come home to every day.  She wanted something beautiful as well as functional.   The vegetable garden is big enough to supply plenty of veggies for her and her rabbits, as well as strawberries, blueberries and apple and pear trees. Once the garden was installed, it is easy to maintain.  The initial investment will pay off many times over in the joy of coming home to a beautiful garden, in addition to the healthy food.

I always recommend that my clients balance their desires, with their budget and their long term goals. If you plan on living in your home for a long time, it is worth spending more money on a strong and safe infrastructure like paths, fences and retaining walls. If you think you may be leaving soon, or are a renter, consider simple beds, containers and annual plantings.

Baby lettuce in raised bed

Vegetables in the raised bed

The raised bed has several functions.  Not only is it a beautiful form that looks good in all seasons, it is strong enough for the owner to sit on while gardening.  For someone with a bad back  this allows for  much easier access to the beds.  We lined the bottom of the bed with hardware cloth, which is a 1/2 inch wire mesh that keeps the gophers out of the bed, which were a huge problem. We also brought in some excellent organic topsoil to fill the raised beds, which produced a wonderful, bountiful harvest.

In considering the “sustainability” factor, we looked at two levels of sustainability.  On a personal level, the garden had to be small enough that she could maintain it in an ongoing basis and that she could afford it. We definitely feel that we accomplished that goal.

On the north side of the house: shade loving plants

Observe your site and put the right plant in the right place

On a “global” level we kept the materials as simple as possible.  The paths are permeable, and covered with old sheets and towels that keep the weeds down, but eventually decompose.  They are covered with free chips from the local tree service.  The beds are built with locally sourced stone.  The irrigation is drip, using a controller that is connected to a local weather station that determines how much to irrigate based on evapotranspiration rates.  And finally, we installed a 2,000 gallon rain water harvesting tank, that stores winter rain from her roof runoff.  This water can be used as back up in times of drought or for fire  safety. In California we are faced with drought, fire and earthquakes.

There’s a lot of information in this post, but it will give you some ideas that you can use in your own garden.  Take time, don’t rush it. The more observation you do in your garden at the front end, the less changes you’ll have to make at the back end.  Your edible landscape is worth the effort.

A welcoming entry into the garden

Copper gate invites you into the garden


Jan 022012
 
After sheet mulching - beauty and bounty

by Avis Licht

After sheet mulching - beauty and bounty

It’s possible to have a backyard that is both productive and good looking

Winter is a good time to think about designing, changing or tweaking your garden.

Instead of being knee deep in garden projects, you can sit back and take the time to consider changes to your garden. Your changes can be big or small, but make sure they fit into the grand scheme.

Curving path on steep hill

Using plants and curving path for hillside erosion control

Your parameters will be:

1. Your site: Whatever you do has to work within the givens of your site. These include your climate, soil, sun/shade, slope, existing plantings that you won’t change, buildings and hardscape: paths, stairs, retaining walls, driveways and fences.

Welcoming entry

A well laid, flagstone path, sturdy yet still informal

2. Your finances: New landscaping can be exceedingly  expensive or fantastically frugal – it depends on how much of the work you do yourself, and whether you use new, used or recycled materials.

Redwood Picket Gate

Gate and Arbor from recycled materials

3. Your desires: What you need and what you want may not always coincide, but at least you can consider them and prioritize them. Not everything needs to be done at once.  Have a plan, then build it over time as you can afford it.

4. The sustainability factor: So hold on here, I have a couple of different definitions of sustainable. Hear me out. On a personal level, your garden is only as sustainable as you can take care of it.  If it takes more work than you can keep up with, then it is NOT sustainable on a personal level.  If it takes more money than you can afford, that too is not sustainable. If you put in plants that require more water than you have available both from nature or from finances, that won’t work either. Your personal input has to coincide with what you can afford on an ongoing basis.

On a more global level, sustainability is about the energy and materials you use to build, maintain and grow your garden. Whether it means reusing the wood from your old fence to build a new one, or using permeable pavers instead of concrete for patios and paths, every time you make a decision on what you will use in your yard, be sure to consider the larger impacts.

Brick step with Wood Edge

Using recycled materials we built a brick step

These bricks were taken from an old job and used by me at my own home.  You don’t have to give up on beauty when you reuse or recycle materials.

Tomorrow I’ll talk about specific designs for edible landscapes for small yards.


Dec 242011
 
Lavender
Lavender

Lavender

I just saw an important talk on a video through TED talks.  It’s by  a man who helped Michelle Obama put a garden in the lawn at the White House.  I hope you will take the time to listen to it. It will make you realize that your garden is not only good for you, but good and important for the well being of the world.  Nothing less. His Name is Roger Doiron and he runs the  Kitchen Gardener’s International.

Kitchen Gardeners UNITE!

The Challenge: Feed more people healthier food while preserving and enhancing the health of the planet. 

Our Solution:  Harness the power of people who grow their own nutritious, delicious, and sustainable food to help others do the same. 

We are a nonprofit community of 20,000 kitchen gardeners from over 100 countries.

Watch Roger’s video, A Subversive Plot: How to Grow a Revolution in Your Own Backyard.

Dec 222011
 
winter savory - Satureja montana

winter savory - Satureja montana

Introduction:

As the title of my blog suggests, I like to do things the easy way whenever possible. Winter Savory is one of those herbs that rank right up there in the easy column. It grows with little care, has no pests, requires little fertilizer or water – what more could you ask of a plant? Winter savory is a perennial herb that grows in all zones.   It has a tangy flavor similar to thyme but is a gentle herb when used in cooking.

Climate:

As far as I can tell, Winter Savory is hardy to -20 deg F.  That’s pretty darn cold.  It comes from the temperate regions of the Mediterranean, but survives in much colder climes. Since it is a perennial it will die back in the winter to the ground. So I’m  not sure why they call it winter savory, since it doesn’t have any green leaves in winter.  Oh well.

Care:

Like other Mediterranean herbs it likes a simple, well drained soil.  Remember, not too rich – no manure or heavy fertilizer. It makes the plant lose it’s aromatic oils which produce the flavor and qualities of the herb. It is a very drought tolerant plant.  I’ve put in places where it got almost no water and it thrived.  I’ve also put it in areas with regular water and it did fine there as well.  Don’t over water, or let it sit in damp places.

In winter I cut it back to the ground.  In  very cold climates you should wait until spring to cut back the plant.  The dead growth on top will help protect the plant.

Winter savory in winter

The top of the plant dies back in winter

Winter savory cut back to the ground

Cut all the dead growth down to the ground

Close up of new growth at the base of the plant

These new shoots will overwinter and begin to grow in Spring

Harvesting and Uses:

You can harvest the leaves and the flowers from this plant. Use the leaves fresh in savory dishes like chicken, fish and pork.  It is renowned for it’s work with beans (by this I mean reducing the flatulental qualities).

You can also make a gentle tea from the leaves which some say helps with sore throats. It couldn’t hurt.

In the edible landscape I use winter savory as an edging plant along paths.  I have a lot of rocks in my garden, that I use to edge paths.  I plant the savory next to the rocks and they do a lovely job of edging and growing over the rocks.

Books About Herbs:

Encyclopedia of herbsRodale’s Illustrated Encyclopedia of Herbs is an excellent source of information on herbs.


Sunset Western Garden book of EdiblesSunset Western Garden book of Edibles has a very detailed section on growing common herbs.


Dec 212011
 

by Avis Licht

Edible blossoms from the pineapple guava

You can eat the petals from this plant. They’re good!

The Pineapple Guava is one of my favorite plants.  It serves many purposes in the edible garden. It’s an easy care, evergreen shrub that has edible flowers, edible fruits and somehow, the deer DON’T eat it.  How could you know?

Where I live, deer eat almost all our plants, so having one that does all these good things is a real treasure.

Climate:The Pineapple guava grows in Zones 8 – 10.  What this really means is that it likes some cool weather, can go down to 10 deg. F, likes rain in the 30″ – 40″ range, and doesn’t like super hot daytime weather – not so good in the desert.

Soil: It’s adaptable to a wide range of soils, including acidic soil, but prefers a humus rich soil that is well drained.  Adding compost and not manure works for this plant.

Water: This is considered a drought tolerant plant, meaning it survives with relatively little water, but needs adequate water for good fruit production. During dry spells you should give it additional water.  In real terms, this means observe your plant. In real terms, in the garden, you always need to observe your plants.  Everyone’s garden is different from the norm that all these books talk about.  You’ll always want and need to adjust requirements to your own situation.

If you need some great information on starting your Spring Garden, have a look at my new ebook, called The Spring Garden Made Easy

the leaves of the Pineapple Guava are neat and compact.

You can prune it, you can eat it, you can watch the hummingbirds feed on the flowers

Sun: Full sun is best – but it can tolerate partial shade

Wind:The Pineapple guava makes a good windbreak. It can take some salt air, but I wouldn’t put it on the dunes as a first line wind break.

Care:  What I really love about this plant is that it needs so little care.  It just grows happily on its own. You can prune it for shape or let it alone. If you prune it back hard, you will lose some fruit production.

Pests: Almost none. Well, I haven’t seen any.

Fruit and flowers:  The flowers which bloom late Spring are edible. The thick petals are spicy and are eaten fresh. The petals may be plucked without interfering with fruit set. The fruit ripens in late Fall, which is a great boon, since almost everything else in the garden is gone.  The fruit in the picture below, came from my garden on December 22 after many days of frost. They taste fresh and tangy. We eat them by scooping out the fruit with a spoon.  Or you can  cook them in puddings, pastry fillings, fritters, dumplings, fruit-sponge-cake, pies or tarts.

Be sure to check out my store for great tools and garden implements.

Scoop the fruit of the pineapple guava

Cut the fruit in half and scoop it out with a spoon. Really tasty.

If you live in the right climate, I really think you ought to try growing the Pineapple Guava. It’s a giving and a forgiving plant for your edible landscape.

If you want to know a lot more about gardening I have lots of posts on my blog and a new e book called The Spring Garden Made Easy. For $4.99 it’s the deal of the century. Check it out here: https://www.ediblelandscapingmadeeasy.com/publications/.

Spring Garden Made Easy

[portfolio_slideshow id=1000].


© 2011-2025 Edible Landscaping Made Easy With Avis Licht All Rights Reserved